How to set up a GitOps CI/CD Pipeline using Jenkins & PipeCD
/ 16 min read
Table of Contents
Ok, so if you are reading this blog, then you might want to know: What’s a CI/CD pipeline? Why do you need them? Or how to build one?…
Long story short, CI/CD pipelines help DevOps engineers with the repetitive task of keeping up with the enormous number of app development updates and prevent them from wasting their time on things like running Docker image builds and going to every source where the app is deployed and replacing the old build with the new one. Another example is that they don’t have to manually run tests for each pull request. They don’t need to manually run linters, push created artifacts to remote repositories, start builds, rollbacks, or even update manifests or Helm charts.
All of these tasks can be automated using CI/CD pipelines! They are just magical for any organization that has to run many tests or follows multiple error-prone deployment steps. This won’t feel necessary at a beginner scale, but when you move on to open-source repositories, you will find that they have CI pipelines for everything, from linters to tests and image updates.
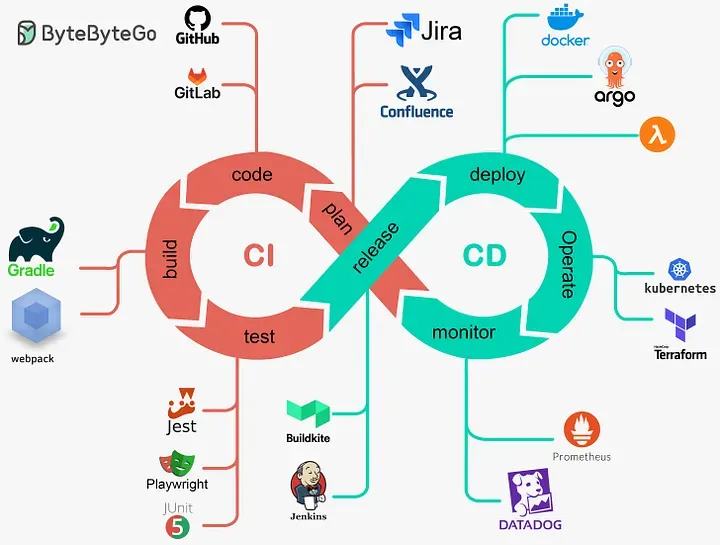
But what is CI / CD?
The next two sections cover the basics of CI and CD, so feel free to skip them if you are a seasoned developer. CI/CD stands for Continuous Integration and Continuous Deployment. These are two steps that any piece of code follows from the developer’s editor to the production environment.
Continuous Integration
CI pipeline is a set of tasks that we need to perform every time code is updated. This can include minor fixes, a new function, or a complete architecture update. Let’s list the steps needed to be performed before calling an update stable and ready to be deployed.
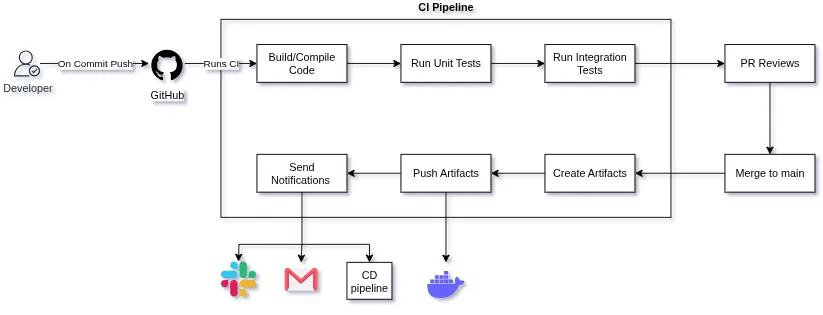
On Commit Push -> Run Linter -> Compile Code -> Run Unit Tests -> Run Integration Tests -> PR reviews -> Merge to Main -> Create Artifacts -> Push Artifacts
This is the basic lifecycle of a code review and publishing that happens whenever the code is updated in a remote repo. Now these steps can vary according to the project you are working on, but the steps remain more or less the same when you are working with projects that maintain certain code standards. Another thing to note is that nowadays most CI pipelines run on GitHub Actions, a pipeline tool built into GitHub. It provides benefits like no requirement for self-hosting tools to manage your CI pipelines and no polling or webhook delay between events; the Pipeline executes as soon as an event occurs on any branch.
But when you move to a larger scale where your repos are getting commits and merges by the minute, or your repo requires just a little more resources then GitHub actions provide for free or when your org is already paying for on-prem or cloud instances, or you have certain specific OS or environment requirements, or you want full on-prem control for security and mangement, you can’t resolve to using GitHub actions. You have to self-host something like Jenkins. Jenkins is a self-hosted CI/CD platform that supports thousands of plugins, with their maintenance and support status right built into the UI. And did I mention the UI, which is simple yet provides so much functionality! It’s just great…
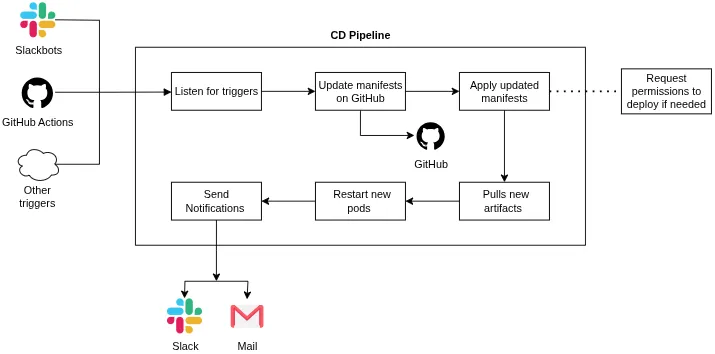
Continuous Deployment
CD pipelines are what keep the internet up to speed with the fast development speeds of the coders. If a developer had to log into every server on which any app is deployed just to take down the service, download a new Docker image, and update the version, there would be so much more downtime added due to human errors. Now think that, but for thousands of servers that firms like Google or Amazon operate. It would be chaos… That is why CD was conceptualized in the first place. “If the testing of code can be automated, then so can the deployment”, and that’s the thought that led to the development of so many DevOps tools, like Ansible, Kubernetes, and Terraform.
This is the benefit of the huge cloud landscape. You will have a combination of tools for all your infrastructure requirements. If you need to deploy directly to Linux servers? Use GitHub Actions + Ansible. Need to deploy to Kubernetes but with secure pipelines? Jenkins + PipeCD or ArgoCD. Need to redefine complete instances on the cloud? GitHub Actions + Terraform. Need to automate updates? Jenkins + Ansible.
There is a solution for every problem here.
So you can look up whatever tools you need for your infra requirements. In this blog, we will discuss a tool I have been using for some time now called PipeCD. PipeCD is an open-source CNCF project. It is a CD tool that caters to Kubernetes, Terraform, Cloud Run, AWS Lambda, Amazon ECS, and is now moving to a plugin-based architecture that allows integration with more such tools! The best advantage of PipeCD is that it provides a unified and easy-to-use, powerful pipeline definition to construct your deployment. You can use a single repo to maintain all your manifests as a single source of truth, and pipecd will track that repository for updates, acting accordingly.
It provides a great UI for tracking updates and deployments with proper rollback capabilities. Another thing that I feel is one of the best features in PipeCD’s architecture is that it runs its control plane separately from the pipeline. Piped is the agent that you can deploy in your cluster or as a simple binary anywhere, and it can manage deployments to all the resources that it has been configured with. The main advantage? Even though Piped manages all the on-ground deployments, it is stateless! This means that piped can run as a pod and there won’t be any issues if it goes down or restarts. It will fetch the configurations from the control plane and start where it left. It’s just great!
The Pipeline
The goal of this section is to deploy a self-hosted GitOps CI/CD pipeline, which detects if something has been pushed to the repo, builds the Docker image, pushes it to DockerHub, deploys the new images on a K3s cluster, and at last notifies the status on a Slack channel. Don’t worry…It’s simpler than it sounds :)
Jenkins: CI pipeline
The pipeline starts at the CI part, for which we are using Jenkins. Inside Jenkins, you can define pipelines in multiple ways, but to keep the CI resources in the repository, we will use a Jenkinsfile. A Jenkinsfile is a file that stays in your app repo, and whenever a build is triggered, Jenkins reads it to know what steps to perform in the build. There are two ways to write Jenkins pipelines, declarative and scripted. You can use either of the two definition styles. I have used scripted as they allow a little more dynamic workflows.
So here comes the Jenkinsfile.
// This Jenkinsfile is used to update a docker image on git push. It pushes 2 versions on each job run.// One image has the job no as the tag and the other has the tag latest.// It also sends slack pings to the default slack channel
node { def newImage try {
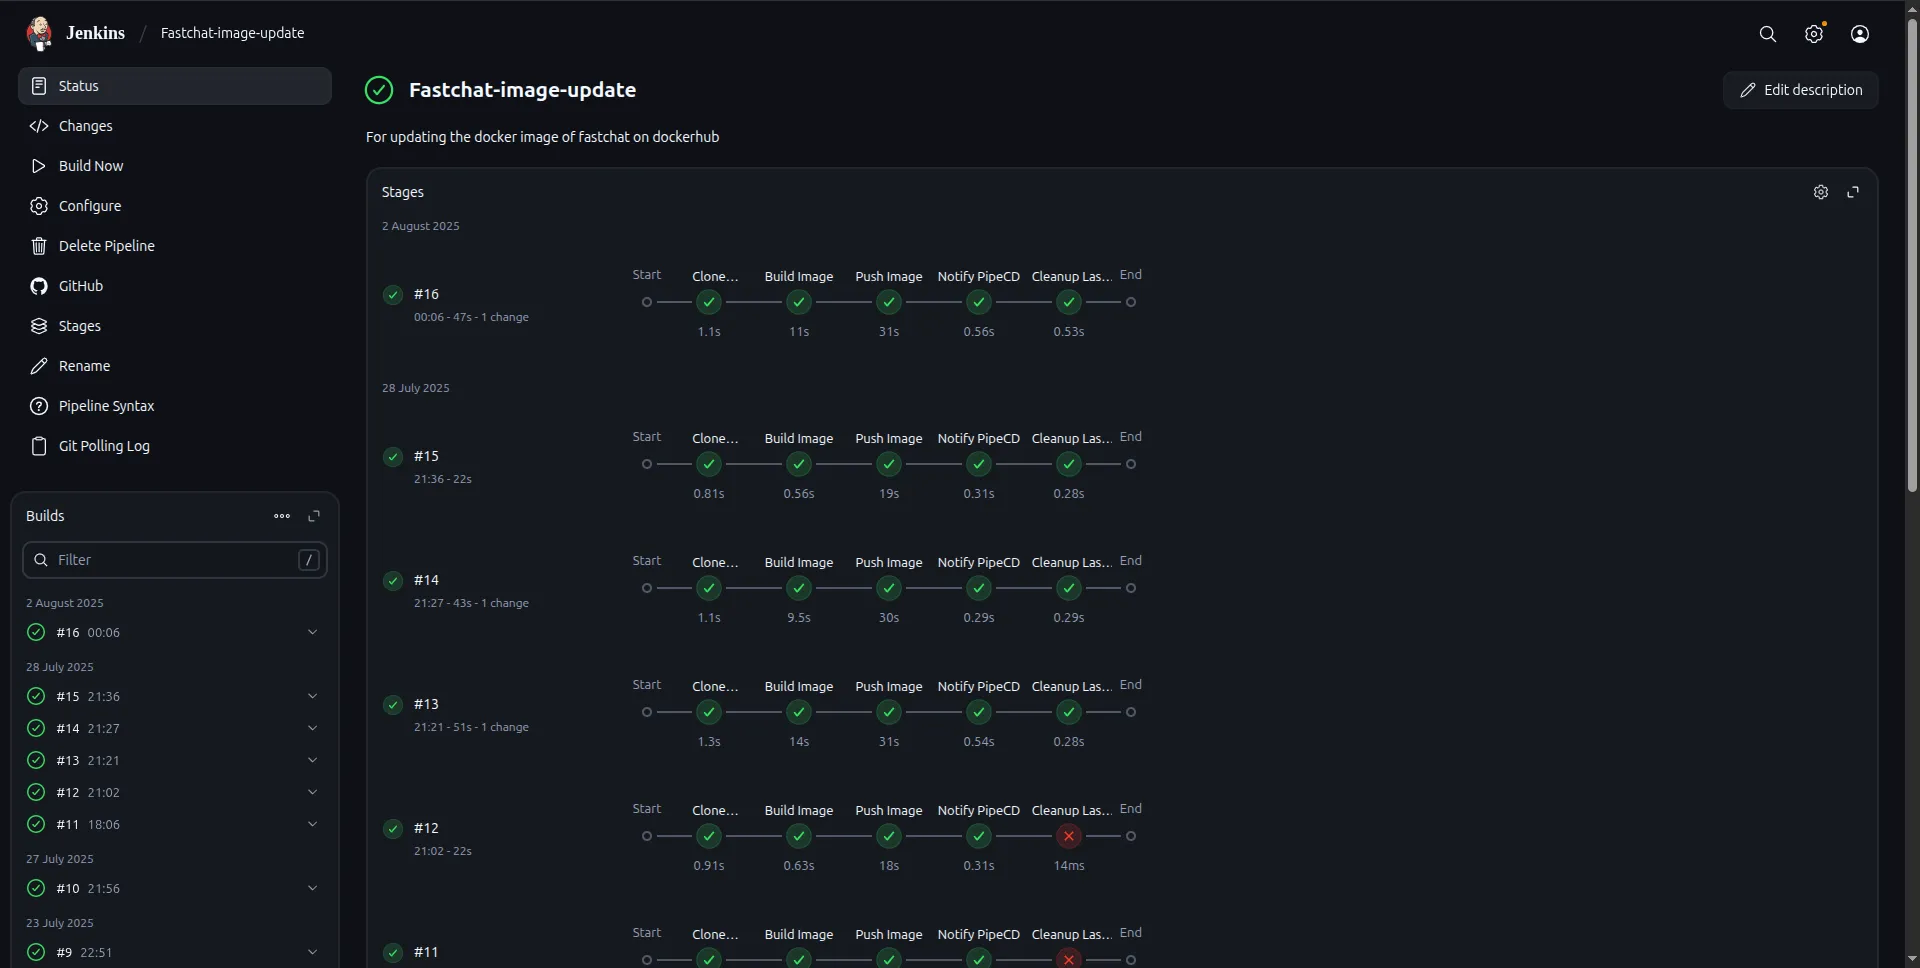
stage("Clone repository") { checkout scm } stage("Build Image") { newImage = docker.build("<dockerhub-id>/<image-name>") } stage("Push Image") { docker.withRegistry("https://registry.hub.docker.com","dockerhub-creds") { newImage.push("v${env.BUILD_NUMBER}") newImage.push("latest") } } withCredentials([ string(credentialsId: 'PIPECD_API_KEY', variable: 'PIPECD_API_KEY'), string(credentialsId: 'PIPECD_API_ADDRESS', variable: 'PIPECD_API_ADDRESS') ]) { stage("Notify PipeCD") { // Note this CI runs on your server so your agent needs to have pipectl installed // After pushing the image, notify PipeCD of a new image update event sh """ pipectl event register \ --insecure \ --address=${env.PIPECD_API_ADDRESS} \ --api-key=${env.PIPECD_API_KEY} \ --name=<app>-image-update \ --data="docker.io/<dockerhub-id>/<image-name>:v${env.BUILD_NUMBER}" """ } } stage("Cleanup Last Local Image") { // To clean up the last docker image after a new image is built and any needed layer cache has been used. // This command will always return a non zero error code def previousBuildNo = env.BUILD_NUMBER.toInteger() - 1 sh """ docker rmi registry.hub.docker.com/<dockerhub-id>/<image-name>:v${previousBuildNo} || true """ } slackSend( color: 'good', message: "${env.JOB_NAME} #${env.BUILD_NUMBER}\nJob successfull!!: Pushed image to DockerHub and notified PipeCD. cc <@slack-id>" ) } catch (e) { stage('Remove dangling images and failed exited containers') { sh """ docker rmi -f \$(docker images -f "dangling=true" -q) || true docker rm -f \$(docker ps -a -f status=exited -q) || true """ } currentBuild.result = 'FAILURE' slackSend( color: 'danger', message: "${env.JOB_NAME} #${env.BUILD_NUMBER}\nBuild failed!? with the error: ${e} <@slack-id>" ) }}Jenkins pipelines are written in the Groovy language, just like above. Quickly going over the file, it is divided into stages, which start with cloning the repository into the job workspace. Here, “checkout scm” means cloning the source code management repo into the workspace. For the second stage to execute, your repository should have a Dockerfile in the root directory for building the image. You can add another third stage in between that runs the image in a container and runs tests on it. The next stage pushes the image to DockerHub, ECR, or any private registry.
The next stage notifies PipeCD to run the CD pipeline. Here we have defined the pipeline in such a way that whenever a Jenkins job gets triggered, if it can build and successfully push a new Docker Image and notify PipeCD using the pipectl CLI command, then its job will succeed.
There are two more steps that the pipeline executes before completing. We haven’t defined any agent in the pipeline because building Docker images in Docker is not recommended. Our images are being built on the node on which Jenkins is running. This requires tools like Docker and pipectl to be installed on the node and mounted inside the Jenkins Docker container. Thus, as the images are being built on your machine, even if you configure Jenkins to maintain only one previous workspace, previous Docker images will still pile up on your node. To take care of this, we tend to remove the second-to-last successfully built image from the node using this stage:
stage("Cleanup Last Local Image") { // To clean up the last docker image after a new image is built and any needed layer cache has been used. // This command will always return a non zero error code def previousBuildNo = env.BUILD_NUMBER.toInteger() - 1 sh """ docker rmi registry.hub.docker.com/<dockerhub-id>/<image-name>:v${previousBuildNo} || true """ }If everything works, then Jenkins will send a notification to your Slack that a build has completed successfully. In case of failure, it will report that the build failed.
Credentials in Jenkins (Kinda Important)
Note: For this Jenkinsfile to execute you should have a Jenkins instance running somewhere which should be able to access your repository. If your repository is private then you should create a pair of SSH keys and add the public key as your deploy key in the repo settings and the private key to Jenkins credentials of type “username with password” with usename as your Github account name and password as the secret key corresponding to the deploy key.
Note: This Jenkins file requires Slack Notification and Docker plugins installed in Jenkins to build Docker images and send Slack pings. You can follow this Guide to link Jenkins to any of your Slack channels. This would require you to add another credential in Jenkins which is for authentication with Slack and will be of the type secret text.
Note: There are two more credentials other than dockerhub PAT defined earlier which are being used in the pipectl command in the Jenkinsfile. These are the PIPECD_API_ADDRESS and PIPECD_API_KEY and both of these are of type “secret texts” where PIPECD_API_ADDRESS is the url:port of the pipecd control plane gRPC API, and PIPECD_API_KEY is the API key that will be generated from the control plane with read and write permissions.
The last one (I promise…) is the DockerHub credentials. You need to define a secret credential of the type “username with password”, it should have your DockerHub account name as username and a custom “Personal Access Token” as your password which you can generate from DockerHub UI. You can also use a credentails manager outside of Jenkins to provide these secrets.
Ok Done with the creds🎉
We are mostly done with the configs. A few things that bugged me during the deployment phase were the following:
-
Make sure to mount the Docker socket into the container and add it as a cloud in Jenkins.
-
Mount your node’s Docker and PipeCD (pipectl) binaries into the cluster so that the job running on the node has access to docker push, build, and pipectl event trigger commands.
-
Use a comfortable polling interval if you are using poll scm, otherwise use GitHub webhooks. For poll scm, you will need to define the polling interval in cron job syntax. I use “H/15 * * * *” which polls GitHub randomly at an interval of 15 minutes, to check for new commits on the remote repo.
-
For using Jenkinsfile, use “Pipeline Script from SCM” while creating a Jenkins job for any application. You will need to add a job for all the repos you want the CI to run for and add the Jenkinsfile to all of them, modified accordingly.
PipeCD: CD pipeline
Now we have the new image ready to be deployed to the cluster with the tags “latest” and “v{Build-Number}”. But we can’t use the latest tagged images in the cluster’s manifests. Why? I’ll answer that in a minute, but first, let’s go over what we will be using for updating our deployments. PipeCD, as we have already discussed, is a CD tool that can handle multiple platforms simultaneously. You can deploy the control plane separately in Docker containers or your cluster using Helm. In both cases, you need a Filestore and a Datastore, which can be AWS S3 and Firestore, respectively. For Homelabbers who want to set it up completely in-house, they can use Minio and MySQL containers instead.
Note: If you have already set up your PipeCD Control Plane, then you can skip this, but if you haven’t, then follow this guide to start your docker compose. Modify the ports and listening IPs according to your needs.
https://pipecd.dev/blog/2024/03/14/control-plane-on-local-by-docker-compose/
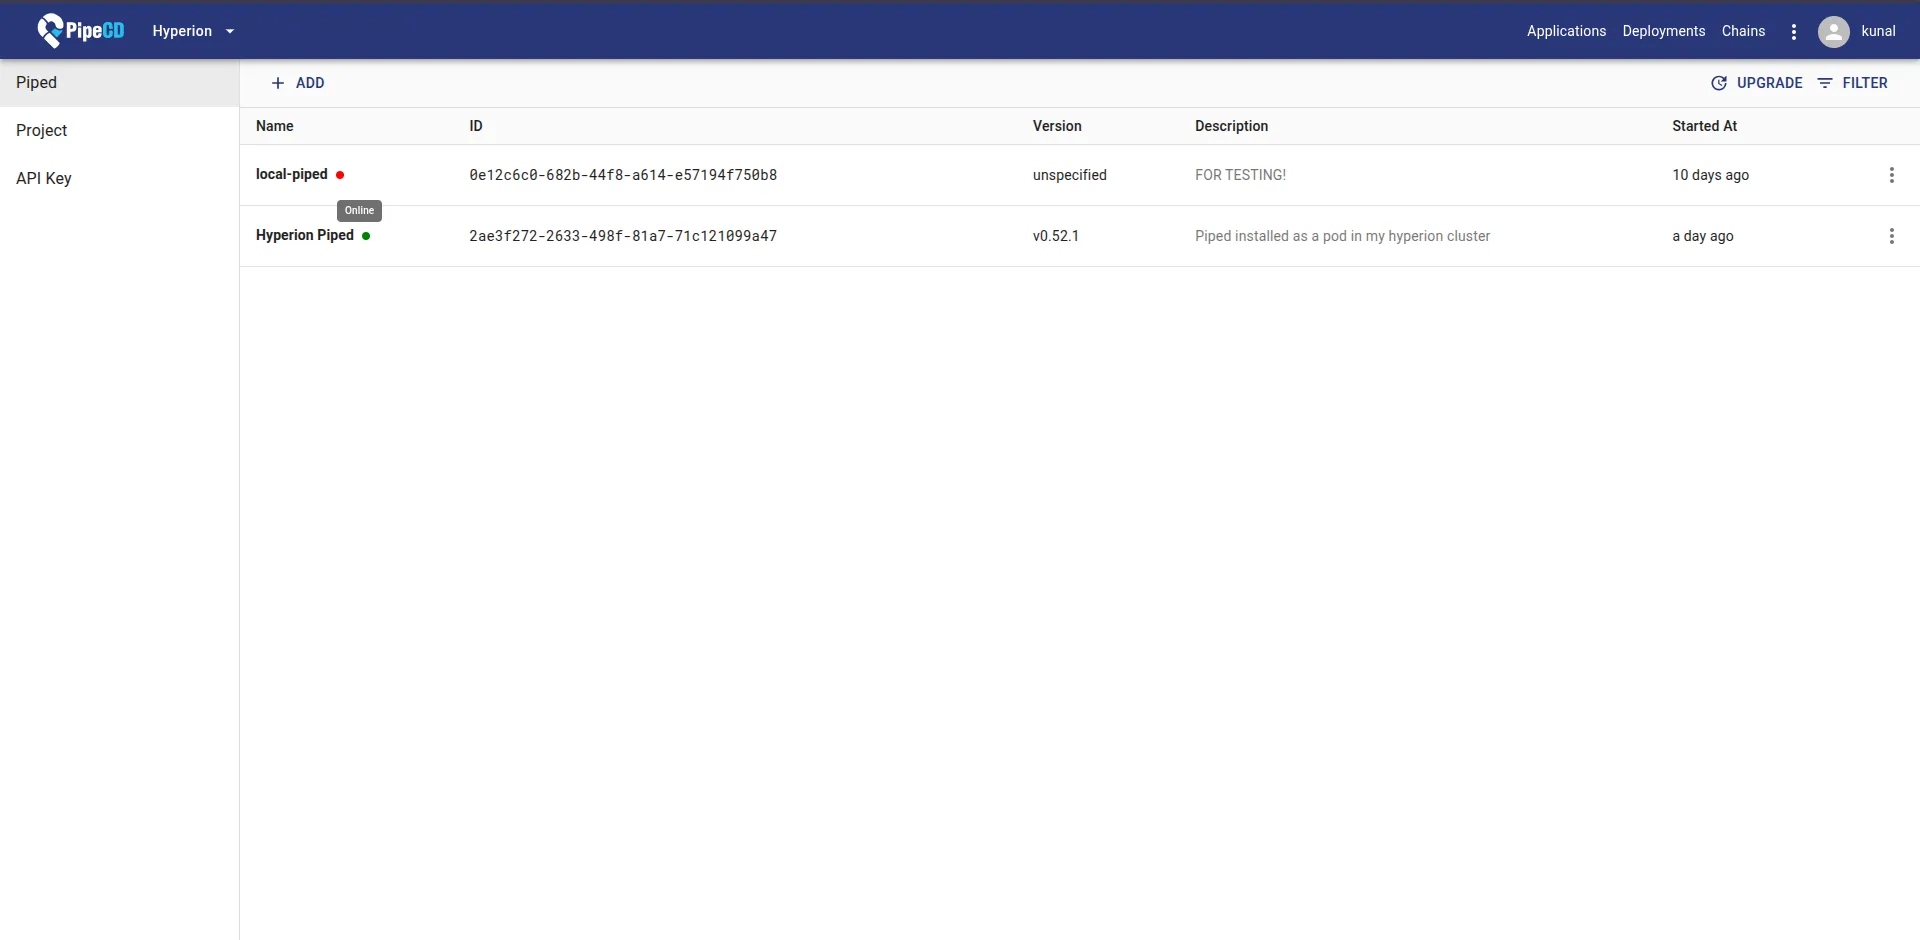
Once you have a control plane set up that you can access, open the UI, create a project with the name you want, then navigate to the menu and select settings. There, you will find an option to add a new piped instance. Add a new piped and give it a name. You will then get a piped key and piped ID. Save these two secrets as they will be used to identify requests from this specific piped.
Piped can be deployed in two ways: one is as a binary on any device that has the permissions to access/modify the cluster in the form of ~/.kube/config, or you can deploy it directly on your cluster in a separate pipecd namespace using a Helm chart, which is my preferred way of doing it. Piped running as a pod will auto-start in case the pod ever crashes and will be monitored just like other pods in your cluster.
You can use this guide for configuring your piped. You have to properly define a piped.yaml before starting a piped with it.
https://pipecd.dev/docs-v0.50.x/installation/install-piped/installing-on-kubernetes/
And this guide for starting piped in your cluster using Helm.
https://pipecd.dev/docs-v0.50.x/installation/install-piped/installing-on-kubernetes/
You will be required to generate two pairs of SSH keys. One for the deploy keys of your GitHub repository and the other for encrypting secrets before placing them in your manifests if you are using PipeCD for your secret management (another cool feature about PipeCD). After this, if you have configured your piped.yaml correctly, you will be able to detect your piped as active in your PipeCD UI.
Now you have a working PipeCD control plane and agent that can access your cluster. All that’s left is to define Kubernetes and PipeCD manifests for your app. These manifests will stay in a repo that you configure your piped to track and will contain all the necessary K8s manifests needed for normally deploying the app in K8s, along with an extra file app.pipecd.yaml.
An example of app.pipecd.yaml that listens for events to update image tags in manifests and uses encrypted secret management provided by PipeCD is given below.
apiVersion: pipecd.dev/v1beta1kind: KubernetesAppspec:  name: <app-name>  eventWatcher:    - matcher:        name: <app>-image-update    # Same as the pipectl command in Jenkinsfile      handler:        type: GIT_UPDATE        config:          replacements:            - file: ./relative/path/to/app/deployment.yaml              yamlField: $.spec.template.spec.containers[0].image    # This specific CI/CD requires only to make a change in the docker image  input:    manifests:      - ./relative/path/to/app/deployment.yaml      - ./relative/path/to/app/service.yaml      - ./relative/path/to/app/ingress.yaml    kubectlVersion: 1.32.5  trigger:    onOutOfSync:      disabled: false    # So the re-application of manifests happen even when the cluster goes out of sync with the defined state in the manifests      minWindow: 0m    # So that you can run another build from jenkins without any delay  encryption:    # Use this if you are using secrets in your app    encryptedSecrets:    # These secrets are key encrypted and safe to push to github for running pipecd but still it is a better practice to keep the repo private      SECRET_KEY: <secret-encrypted-using-pipecd-ui>    # These are secrets defined as environment variables for the application      DB_URI: <uri-encypted-using-pipecd-ui>    decryptionTargets:    # The files that utilise encrypted secrets provided in this file      - ./relative/path/to/app/deployment.yaml
  description: |    This app config is a demo made for this blog.
EventWatcher is a pipecd component that listens for events and updates the manifests with whatever is provided in the pipectl events. Now, do you remember I mentioned that we can’t use the latest tagged image in the manifests? The reason is that K8s will not stop you from doing it, but if you update the latest tagged image, even if you have configured the imagePullPolicy: Always, upon reapplying the manifests, whether manually or using pipecd, the app pods will not be updated! And this seems unusual…If the imagePullPolicy is set to Always, then it should pull the image every time I apply the manifests, right?!
No. K8s only updates the pods if their template is updated. It hashes the spec.template object provided in the deployment/pod manifest and adds that hash as an annotation to the replicaset. Now, if you use the latest tagged image in your deployment.yaml, upon an event from pipectl or a manual sync from the UI, pipecd will apply the same manifest to the cluster. This means that spec.template will be completely the same, with the only change being the contents of the latest tagged image, but that doesn’t change the spec.template hash in any way, so the hash will remain same, and K8s will not register the new application of manifests, thus your CD won’t work.
The solution is to update the manifest with the newer image tag, which will come from the pipectl event from the Jenkinsfile. Thus, every time your manifest is applied, the hash will be updated, and pods will restart, and your CI/CD pipeline will update your apps on prod as expected.
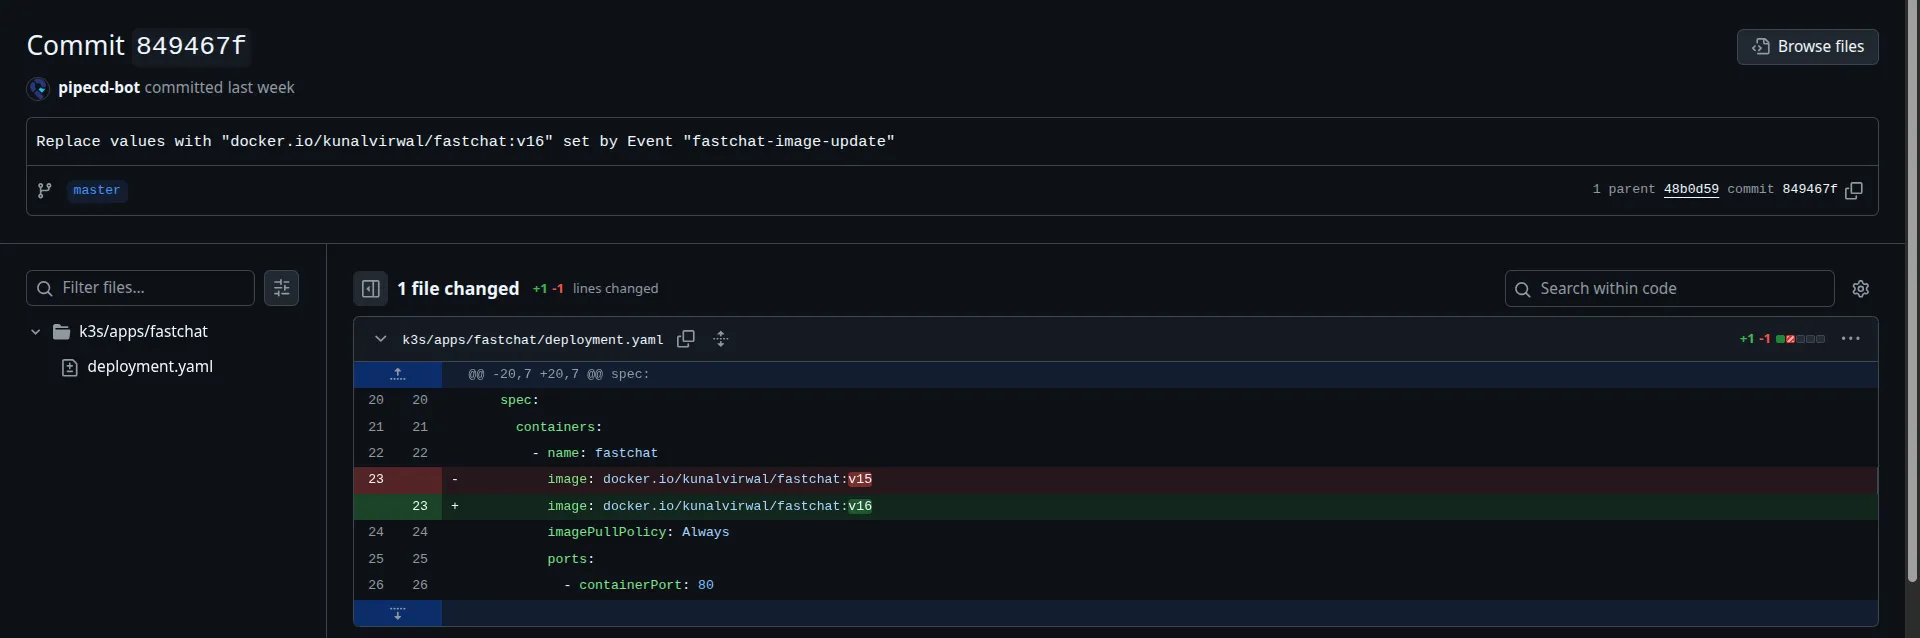
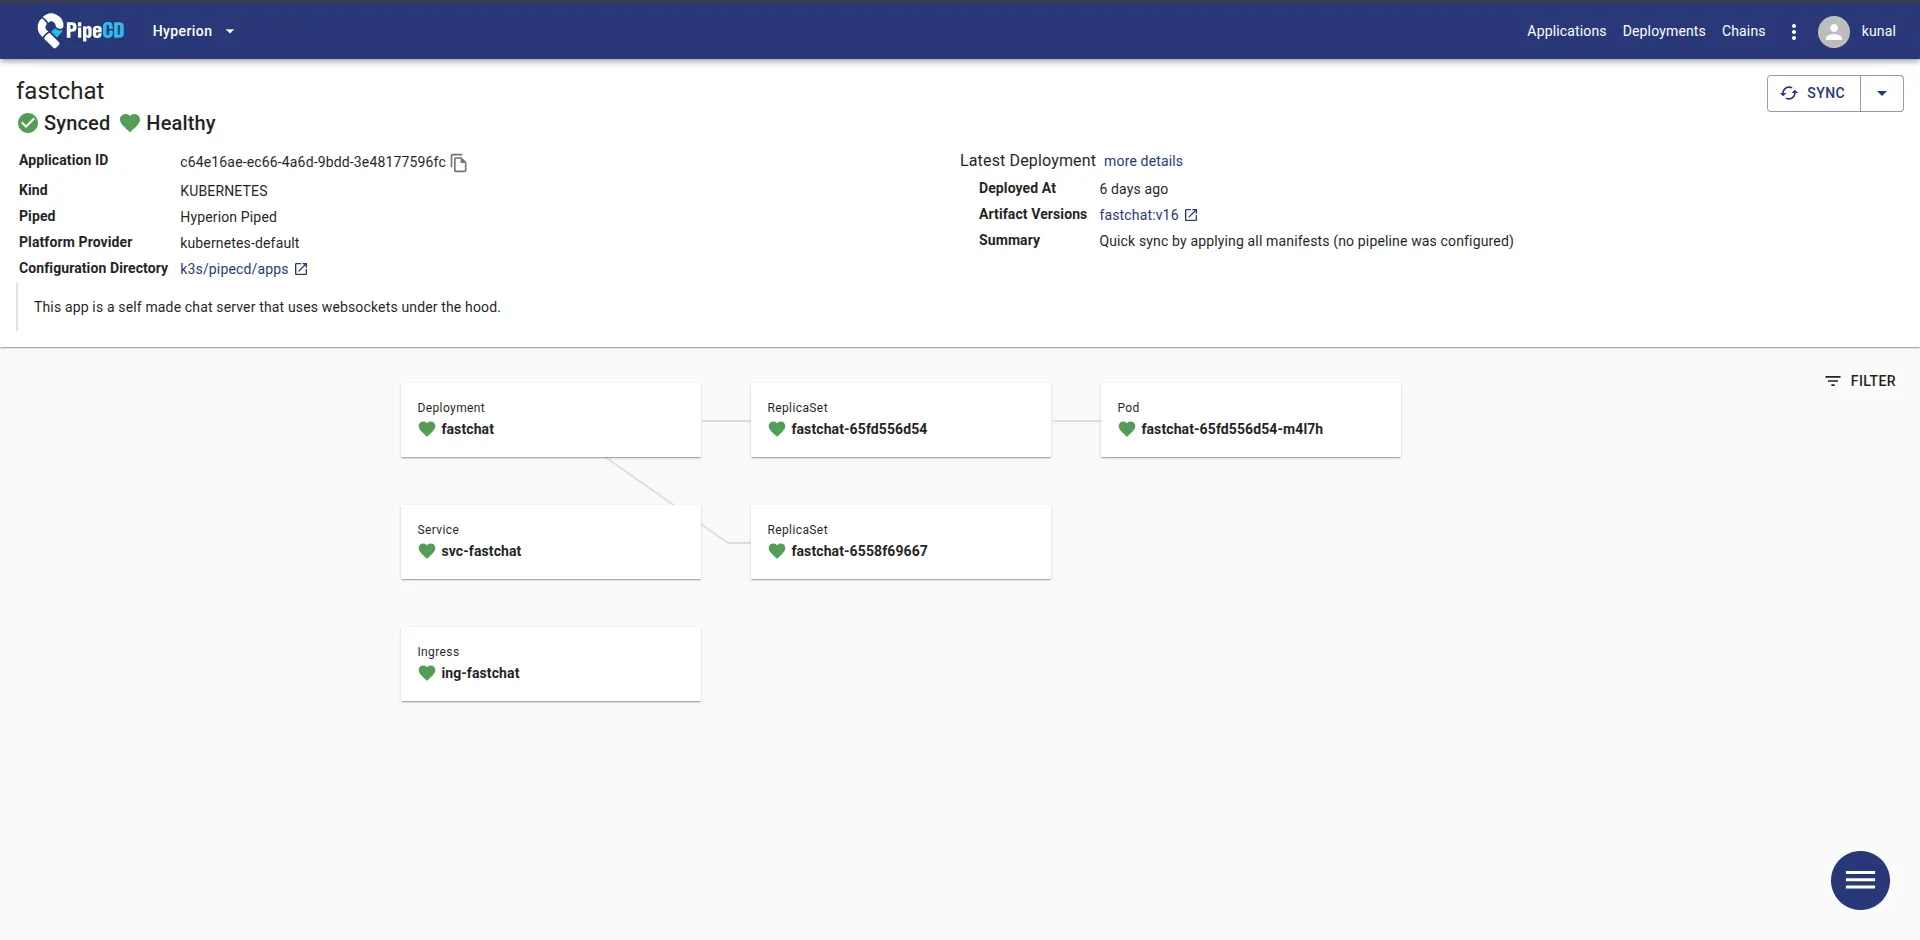
With this, the CI/CD pipeline should be working now. If the deployment fails, go through the K8s_sync logs provided on the deployment page in PipeCD to find out what’s wrong with the manifests.
Congrats!🎉 You have set up a fully automated GitOps CI/CD pipeline for your K3s cluster.